

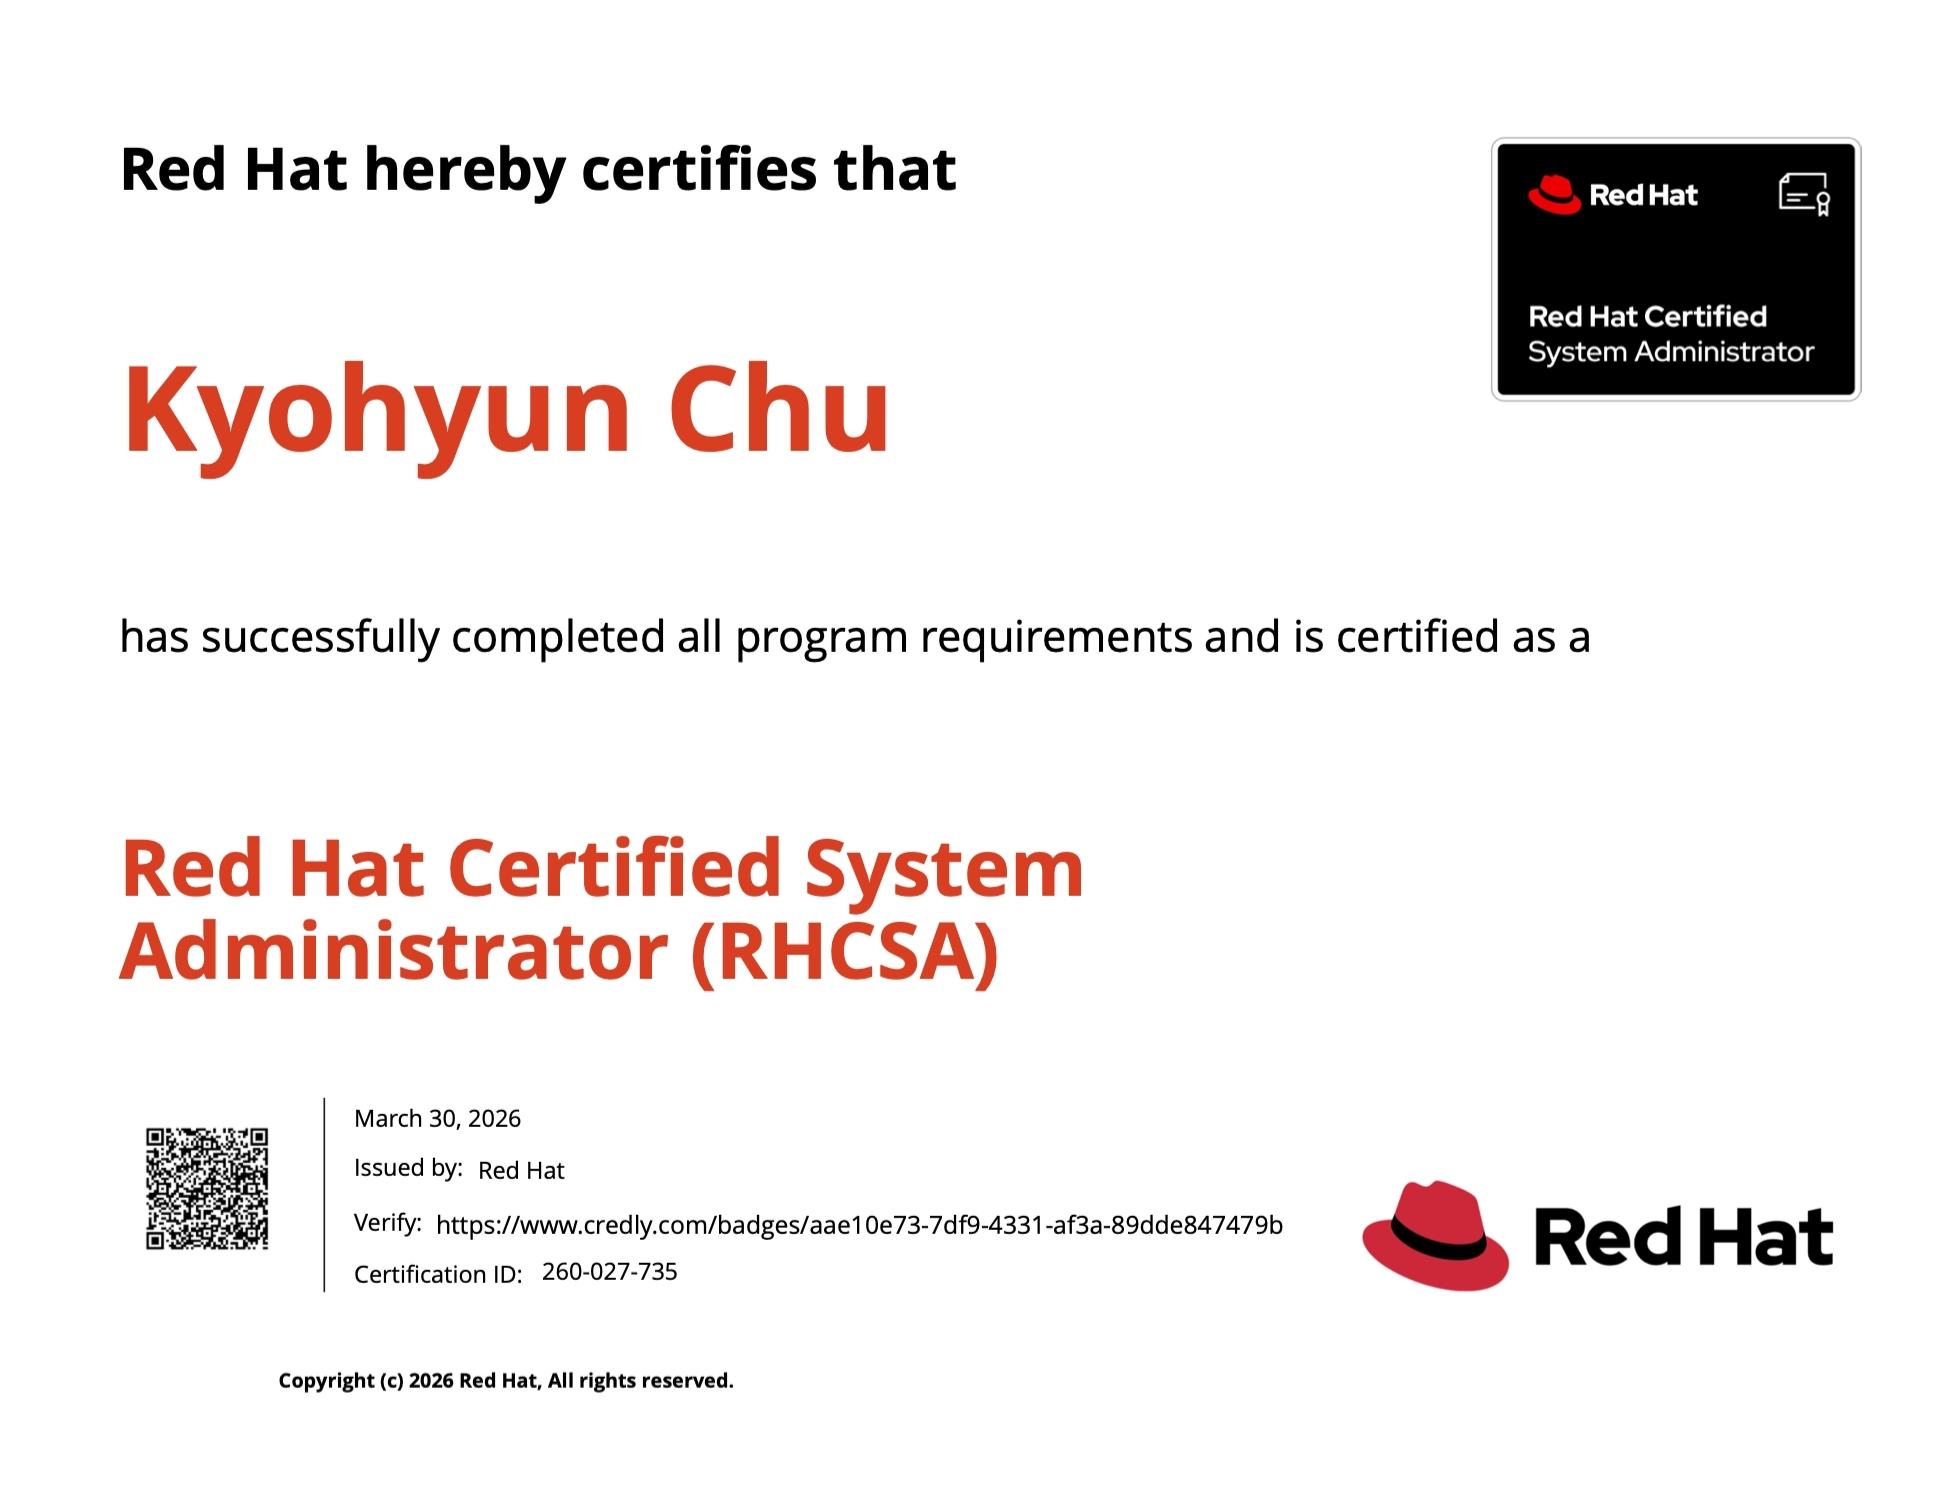
저희 컴퓨터시스템 연구실에서는 Linux를 능숙하게 다루는 것이 중요하여 교수님께서 RHCSA(Red Hat Certified System Administrator)를 취득하도록 연구실 차원에서 지원해 줍니다.
문제는 대학원 연구와 병행하다 보니 시간을 내서 공부하기가 쉽지 않았고 결국 세 번째 시도 끝에 자격증을 취득하게 되었습니다. 첫 번째: 절대적인 공부량 부족, 두 번째: 모든 문제를 잘 풀었음에도 네트워크 설정 오류로 인해 채점되지 않음, 세 번째: 다행히 합격…!
세 번의 시험 모두 기출문제(덤프)에서 크게 벗어나지 않았습니다. 세부적인 값은 매번 달라지지만 문제 유형 자체는 거의 동일한 것 같습니다. 그렇기에 기출문제 위주로 공부하는 것이 가장 효율적인 방법입니다.
이 글을 보시는 분들은 꼭 한 번에 합격하셨으면 좋겠습니다

세 번째 시험 성적 : 합격
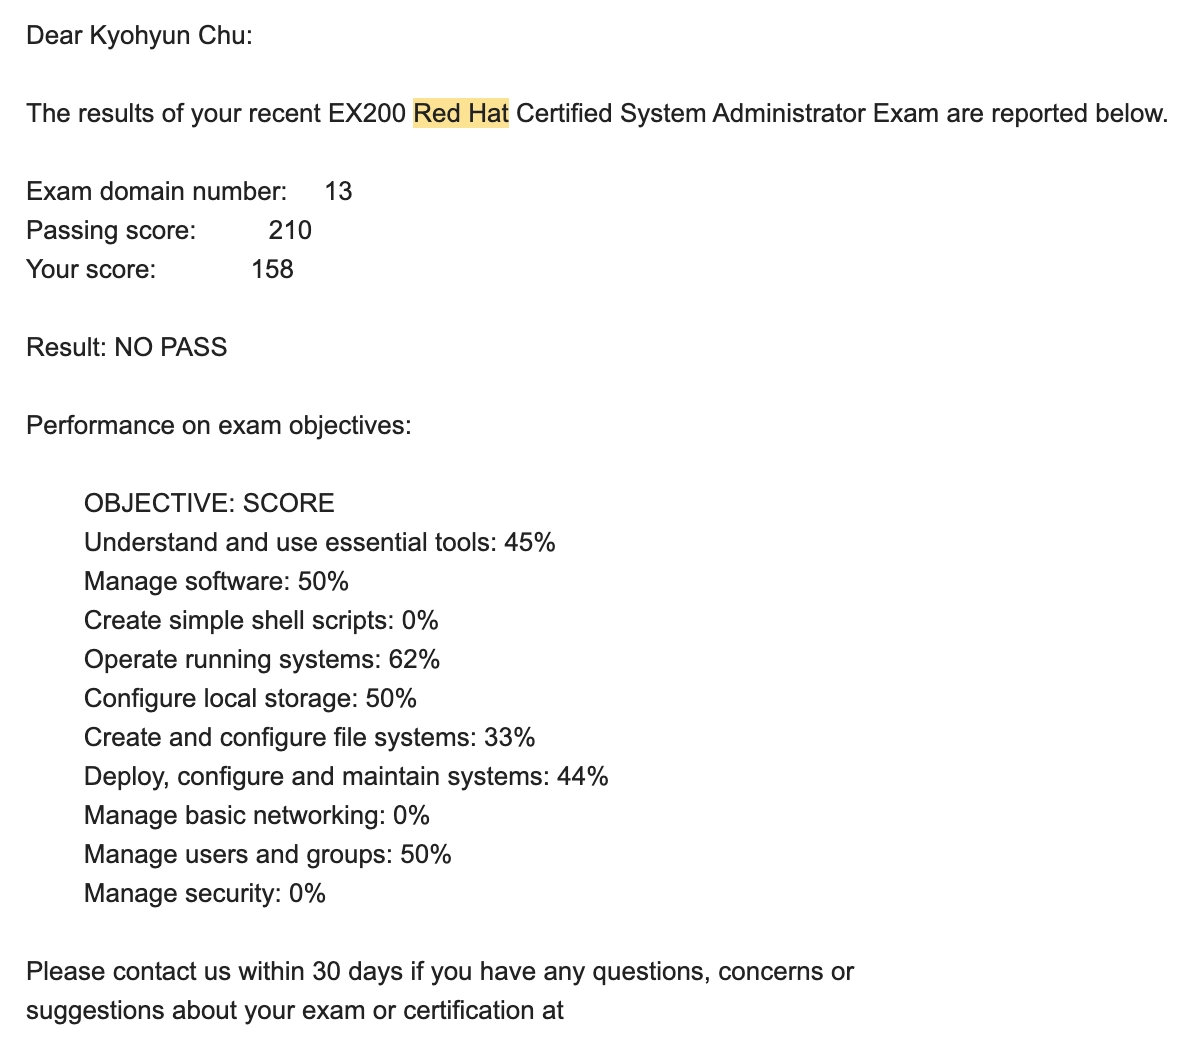
첫 번째 시험 성적 : 불합격
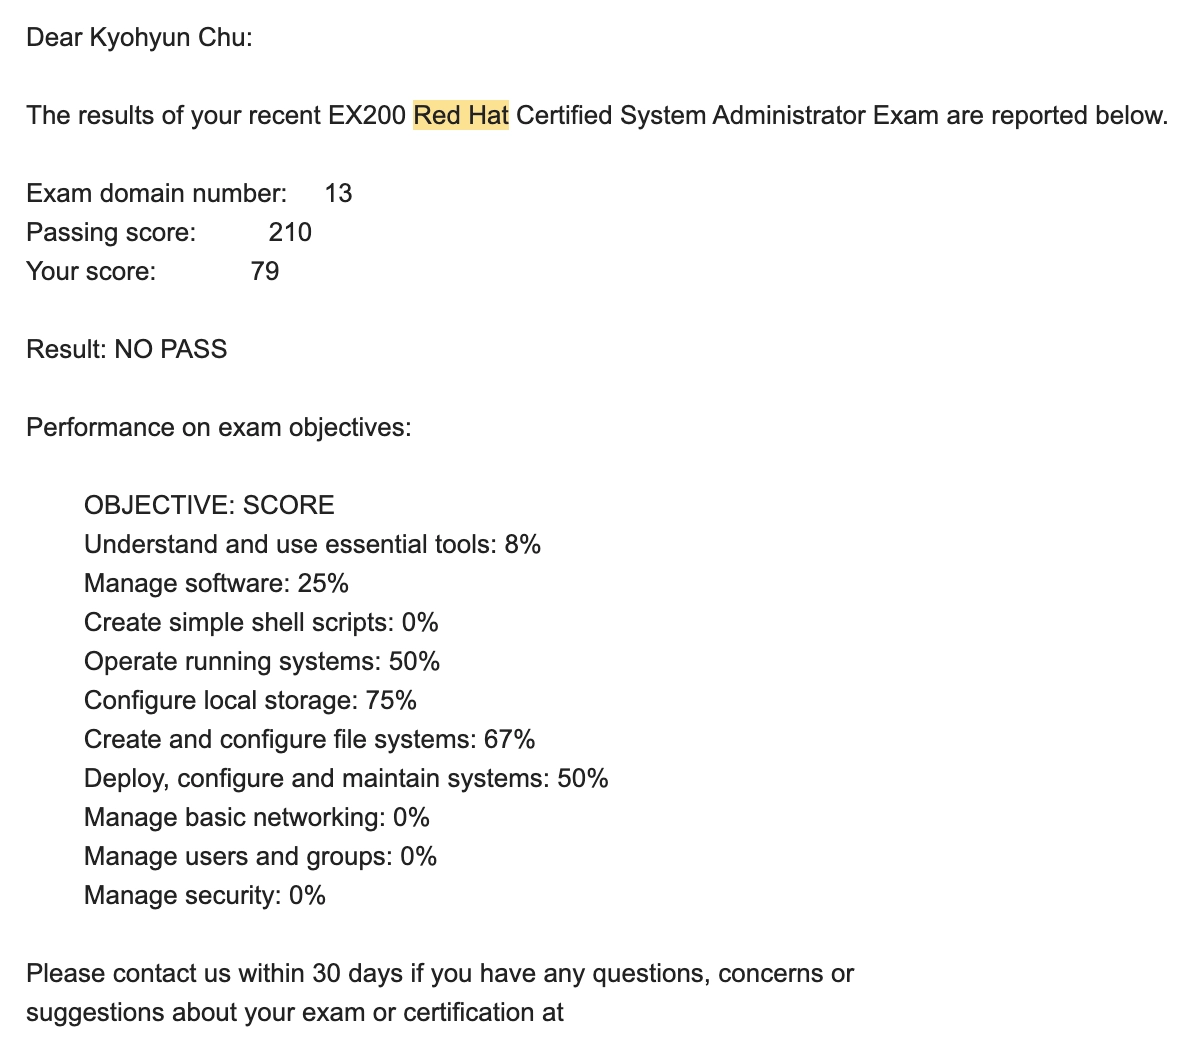
두 번째 시험 성적 : 불합격
기출문제 정리
Node 1
1.
[필수] Network 설정 (Manage Basic Networking)
•
Host Name: node1.domain250.example.com
•
IPv4 address: 172.25.250.100
•
Subnet mask: 255.255.255.0
•
Gateway: 172.25.250.254
•
DNS: 172.25.250.254
nmcli device로 현재 연결된 Connection 확인 (Ex. Wired Connection 1)
nmtui
Edit a connection '연결된 Connection'
manual로 변경하고 Address, Gateway, DNS 적기
Search Domain은 건드리지 말 것!
Acitvate a connection # 활성화시키기
Set system hostname # Hostname 설정
Bash
복사
여기서 잘못 설정하면, 채점이 안 됩니다… 알고 싶지 않았는데, 알게 되었어요… 반드시 확실히 제대로 수행 후, 넘어가셔야 됩니다!!!
최종 확인
hostname # 현재 hostname 확인
ip addr show # IP 주소 확인
ip route show # Gateway 확인
cat /etc/resolv.conf # DNS 확인
reboot
Bash
복사
2.
[필수] Yum Repository 설정 (Manage software)
Configure YUM repos with the given link
BaseOS http://content.example.com/rhel8.0/x86_64/dvd
AppStream http://content.example.com/rhel8.0/x86_64/dvd/AppStream
vi /etc/yum.repos.d/abc.repo
# 아래와 같이 입력 및 저장
[BaseOS]
name=BaseOS
baseurl=http://content.example.com/rhel9.0/x86_64/dvd/BaseOS
enabled=1
gpgcheck=0
[AppStream]
name=AppStream
baseurl=http://content.example.com/rhel9.0/x86_64/dvd/AppStream
enabled=1
gpgcheck=0
# [추가] URL로 zsh 패키지 설치하기
dnf install http://example.com/pub/zsh.rpm -y
Bash
복사
최종 검증
dnf clean all
dnf repolist all
Plain Text
복사
3.
Firewall (Manage security, Deploy, configure, and maintain systems)
•
Install the Apache HTTP server (httpd)
•
Configure the server to display the text "Welcome to RHEL 10" when the site is accessed
•
Ensure the service starts automatically at boot
•
Configure the firewall to allow traffic for HTTP services permanently
dnf install httpd -y
systemctl enable --now httpd
echo "Welcome to RHEL 10" > /var/www/html/index.html
firewall-cmd --permanent --add-service=http
firewall-cmd --reload
Bash
복사
저는 사실 Security 문제는 과감하게 공부도 안 하고 안 풀긴 했습니다. 참고해 주세요!
최종 검증
curl http://localhotst
Bash
복사
4.
사용자 계정 생성 (Manage users and groups)
Create User accounts with supplementary group
- create the group named "sysadms”
- create users named "natasha" and "harry", will be the supplementry group "sysadms”
- create a user named "sarah", should have non-interactive shell and it should be not the member of "sysadms”
- password for all users should be "trootent”
<visudo>
- "sysadms" group has access to user add in the server
- "harry" user has access to set password for users without asking sudo password
groupadd sysadms
useradd -G sysadms natasha
useradd -G sysadms harry
useradd -s /sbin/nologin sarah
passwd natasha
passwd harry
passwd sarah
# 반드시 경로 확인
which useradd
which passwd
visudo
# 아래와 같이 입력 및 저장
%sysadms ALL=(ALL) /bin/useradd
harry ALL=(ALL) NOPASSWD: /bin/passwd
# [추가] alex는 모든 명령어를 패스워드 없이 실행시킬 수 있음 (세 번째 시험 때, 나옴)
alex ALL=(ALL) NOPASSWD: ALL
# [추가] alex가 패스워드 없이 dnf를 실행시킬 수 있음
alex ALL=(ALL) NOPASSWD: /usr/bin/dnf
Bash
복사
%sysadms ALL=(ALL) NOPASSWD: ALL
최종 검증
grep sysadms /etc/group # 현재 sysadms 그룹 안에 어떤 user가 있는지
grep sarah /etc/passwd # /sbin/nologin 확인
visudo -c # visudo 문법 검사
Bash
복사
5.
Crontab (Deploy, configure, and maintain systems)
Configure a cron job that runs every 2 minutes and executes: logger "EX200 in progress" as the user natasha. (which ABC : ABC의 경로 파악)
dnf install -y cronie
systemctl enable --now crond
crontab -u natasha -e
# 아래와 같이 입력 및 저장
*/2 * * * * logger "EX200 in progress"
Bash
복사
Configure a cron job that runs dailys at 12:30 local time and executes /bin/echo “Hello World” as the user natasha (+ 특정 경로에 저장하기)
dnf install -y cronie
systemctl enable --now crond
crontab -u natasha -e
# 아래와 같이 입력 및 저장
30 12 * * * /bin/echo "Hello World" >> /home/natasha/hello.log
Bash
복사
user root가 cron job을 하게끔 설정해라. 매일 12:45 AM에 실행. /tmp 디렉토리에 모든 비어 있는 파일을 찾고 제거해라.
crontab -e -u root
45 00 * * * find /tmp -type f -empty -delete
# -empty 텅빈 파일들을 -delete 제거해라
Bash
복사
Configure the system so that only the user tom is allowed to create cron jobs.
vim /etc/cron.allow # cron.deny
tom
Bash
복사
최종 검증
tail -f /var/log/messages
Bash
복사
6.
협업 디렉토리 (Manage users and groups)
특수 권한
Setuid | 4xxx | 실행 파일을 소유자 권한으로 실행 |
Setgid | 2xxx | 새 파일이 디렉터리 그룹 상속 |
Sticky Bit | 1xxx | 본인 파일만 삭제 가능 |
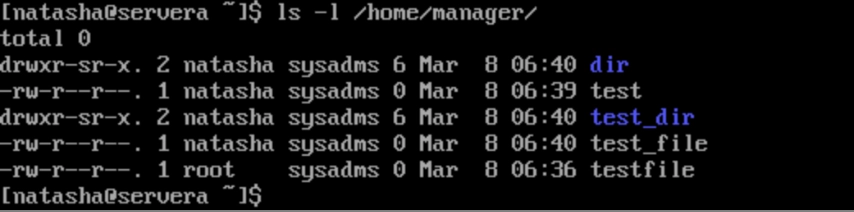
Create a collaborative Directory
- Create the Directory "/home/manager" with the following characteristics
- Group ownership of "/home/manager" should go to "sysadms" group
- The directory should have full permission for all members of "sysadms" group but not to the other users except "root"
- Files created in future under "/home/manager" should get the same group ownership
mkdir -p /home/manager
groupadd sysadms
chown root:sysadms /home/manager
chmod 2770 /home/manager
Bash
복사
최종 검증
ls -ld /home/manager
su - natasha
touch /home/manager/test
mkdir /home/manager/test
ls -l /home/manager/
Bash
복사
/shared/projects 디렉토리 생성하고 모든 사용자가 파일 생성(쓰기)을 할 수 있지만, 본인이 만든 파일만 삭제 가능하도록 해라 (Stick Bit 사용)
mkdir -p /shared/projects
chmod 1777 /shared/projects
Bash
복사
최종 검증
ls -ld /shared/projects
su - natasha
touch /shared/projects/natasha_file
exit
su - harry
rm /shared/projects/natasha_file
touch /shared/projects/harry_file
rm /shared/projects/harry_file
exit
Bash
복사
7.
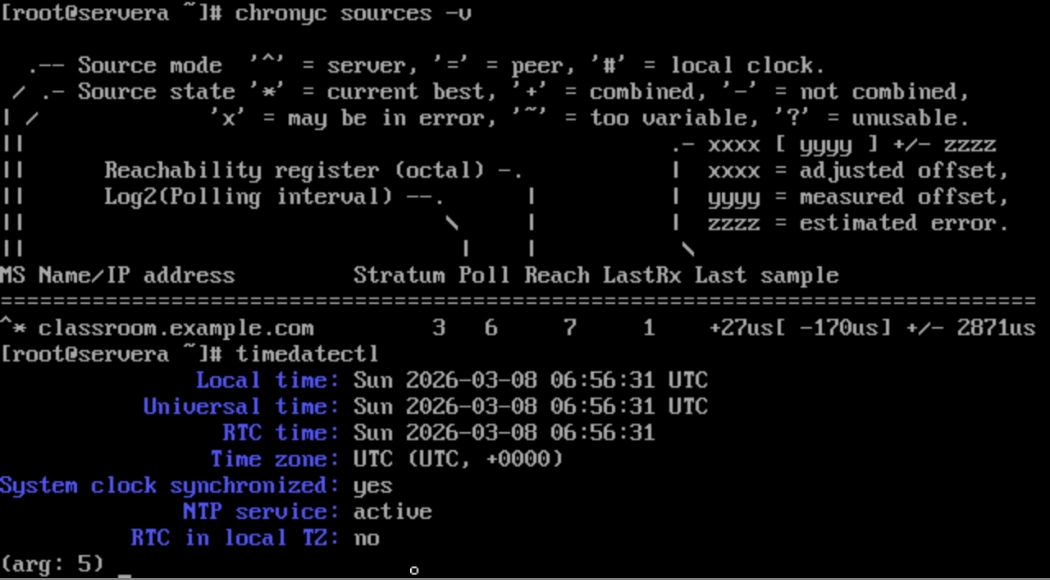
NTP (Deploy, configure and maintain systems)
dnf install -y chrony
vi /etc/chrony.conf
# 아래와 같이 입력 및 저장
server ntp.example.com iburst # 다른 server 및 pool은 주석처리
ㅅ
systemctl enable --now chronyd
Bash
복사
최종 검증
systemctl restart chronyd
timedatectl
chronyc sources -v
Bash
복사
8.
AutoFS (Create and configure file systems)
1.
Install the necessary NFS and Autofs packages.
2.
Configure Autofs to mount the remote directory 192.168.1.100:/shares/public (replace IP with your lab's NFS server IP) to the local directory /data/public.
3.
The mount should only happen on-demand (when the directory is accessed).
4.
Ensure Autofs starts automatically at boot.
dnf install autofs nfs-utils -y
vim /etc/auto.master
/data /etc/auto.data
# 리눅스에게 "/data 내의 모든 폴더에 대해서 /etc/auto.data 파일에 있는 지침을 따르라"고 지시함
vim /etc/auto.data
public -rw,sync 192.168.100:/shares/public
# 누군가 하위 폴더인 'public'을 요청하면, 바로 그 위치에 NFS 공유 디렉토리 ...:/shares/public을 마운트하라
systemctl enable --now autofs
Bash
복사
최종 검증
ls /data/public
touch /data/public/testfile
ls -l /data/public/testfile
Bash
복사
⇒ 재부팅 후, 지금까지 푼 모든 문제들 다 status로 구동 여부 체크함
9.
파일 찾기 (Understand and use essential tools)
Find all files and directories which is created by a user "natasha" in to this system and copy it into a "/root/natashafiles" directory
mkdir -p /root/natashafiles
find / -user natasha -exec cp -av {} /root/natashafiles/ \;
# 5M초과의 파일들을 찾아라
find / -type f -size +5M -exec cp -av {} /find/5mfiles/ \;
Bash
복사
⇒ 파일만 : -type f
최종 확인
ls -l /root/natashafiles
Bash
복사
10.
문자열 찾기 (Understand and use essential tools)
Find all strings "ich" from "/usr/share/dict/words" file and copy that strings in a /root/lines file.
grep "ich" /usr/share/dict/words > /root/lines
Bash
복사
최종 확인
cat /root/lines
Bash
복사
11.
아카이브 생성 (Understand and use essential tools)
/usr/local의 내용을 포함하는 tar 아카이브를 생성하고, 이를 bzip2로 압축하여 /root/backup.tar.bz2로 저장
tar -cvjf /root/backup.tar.bz2 /usr/local
Bash
복사
/usr/local의 내용을 포함하는 tar 아카이브를 생성하고, 이를 gzip로 압축하여 /root/backup.tar.gz로 저장
tar -cvzf /root/backup.tar.gz /usr/local
Bash
복사
최종 확인
tar -tvf /root/backup.tar.bz2(gz)
Bash
복사
12.
파일 권한
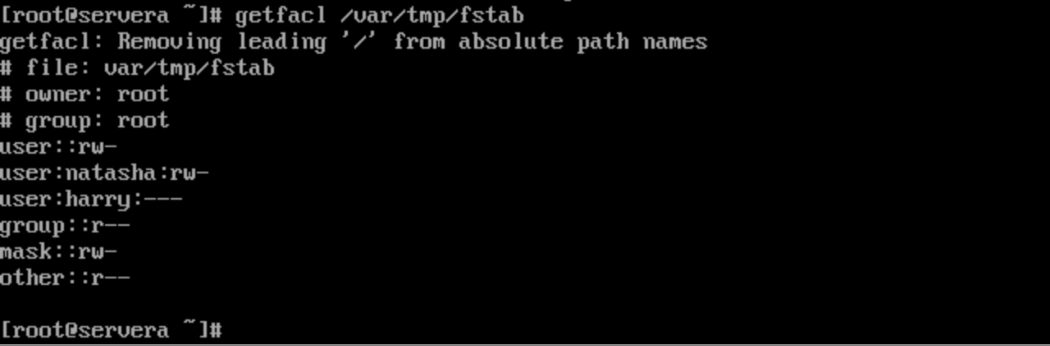
Copy the file /etc/fstab to /var/tmp/fstab. Configure the permissions of /var/tmp/fstab so that:
- the file /var/tmp/fstab is owned by the root user
- the file /var/tmp/fstab belong to the group root
- the file /var/tmp/fstab should not be executable by anyone
- the user "natasha" is able to read and write /var/tmp/fstab
- the user "harry" can neither write nor read /var/tmp/fstab
- all other users (current or future) have the ability to read /var/tmp/fstab
Allow the finance group to have Read and Execute (r-x) access to the /groups/accounting directory and any new files created within it.
cp /etc/fstab /var/tmp/fstab
chown root:root /var/tmp/fstab
chmod 644 /var/tmp/fstab
setfacl -m u:natasha:rw- /var/tmp/fstab
setfacl -m u:harry:--- /var/tmp/fstab
setfacl -m o::r-- /var/tmp/fstab
--
setfacl -R -m g:finance:r-x /groups/accounting
# 1) g:finance & 2) d:g:finance 합침
# 1) 현재 디렉토리에 권한 줌
# 2) 새로운 파일들에게 권한 줌
Bash
복사
최종 확인
ls -ld /var/tmp/fstab
getfacl /var/tmp/fstab
Bash
복사
13.
사용자 생성 (Manage users and groups)
Create a user "unilao" with UID "2334" with password as "souspolo”
•
can't access an interactive shell
useradd -u 2334 -s /sbin/nologin unilao
passwd unilao
Bash
복사
최종 확인
id unilao
su - unilao # 비밀번호 souspolo
Bash
복사
Change the user sam's default login shell to /bin/bash.
Set the account to expire on December 21, 2029.
useradd -s /bin/bash -e 2029-12-21 sam
Bash
복사
14.
Systemd Timer (Deploy, configure and maintain systems & Create simple shell scripts)
v10부터 추가된 문제인데, 쉘 스크립트 문제와 같이 엮어서 나옵니다.
Task: On ServerB, replace a legacy Cron job with a Systemd Timer.
1.
Create a script /usr/local/bin/notify.sh that prints "Time for Break!" to the system log (use logger). Make it executable.
2.
Create a service unit notify.service.
3.
Create a timer unit notify.timer that runs this service daily at 7:00 AM.
4.
Ensure the timer is active and enabled.
vim /usr/local/bin/notify.sh
#!/bin/bash
logger "Time for Break!"
chmod +x /usr/local/bin/notify.sh
vi /etc/systemd/system/notify.service
# 아래와 같이 입력 및 저장
[Unit]
Description=Notify Break Time Service
[Service]
Type=oneshot
ExecStart=/usr/local/bin/notify.sh
vi /etc/systemd/system/notify.timer
# 아래와 같이 입력 및 저장
[Unit]
Description=Notify Break Time Timer
[Timer]
OnCalendar=*-*-* 07:00:00
Persistent=true
[Install]
WantedBy=timers.target
Bash
복사
•
/usr/local/bin/system-check.sh에 현재 날짜를 /var/log/system-check.log 파일에 추가하는 스크립트를 작성하십시오. 이 스크립트가 실행 가능하도록 설정하십시오.
•
이 스크립트를 실행하는 system-check.service라는 systemd 서비스 유닛을 생성합니다.
•
1분마다 서비스를 실행하는 system-check.timer라는 systemd 타이머 유닛을 생성합니다.
vim /usr/local/bin/system-check.sh
#!/bin/bash
date >> /usr/local/bin/system-check.log
chmod +x /usr/local/bin/system-check.sh
vim /etc/systemd/system/system-check.service
# 아래와 같이 입력 및 저장
[Unit]
Description=System Check Service
[Service]
Type=oneshot
ExecStart=/usr/local/bin/system-check.sh
vim /etc/systemd/system/system-check.timer
# 아래와 같이 입력 및 저장
[Unit]
Description=Run System Check every minute
[Timer]
OnCalendar=
Persistent=true
[Install]
WantedBy=timers.target
systemctl daemon-restart
systemctl enable --now system-check.timer
Bash
복사
Systemd Timer 속성
Node 2
1.
[필수] Root Password 재설정 또는 응급 복구 진입 (Operate running systems)
이 문제를 풀지 못하면, 애초에 Node 2 문제를 풀 수가 없습니다. 첫 번째 시험 때, 패스워드 재설정 방법이 헷갈려서 거의 1시간 넘게 썼네요… 아래 응급 복구 모드랑 타임아웃 변경은 사실 나오지는 않았는데 혹시 몰라서 공부했습니다.
a.
️️️ Root Password 재설정 ️️️•
Reboot → GRUB 메뉴에서 e 누르기
•
linux … 맨 끝에 : rw init=/bin/bash 입력 (rw도 같이 적어주기)
•
ctrl+x 누르기
passwd root
touch /.autorelabel
exec /sbin/init
Bash
복사
b.
응급 복구 모드
•
linux … 맨 끝에 : systemd.unit=emergency.target 입력
•
ctrl+x 누르기
c.
GRUB boot 메뉴 타임아웃 변경
vim /etc/default/grub
GRUB_TIMEOUT=10
grub2-mkconfig -o /boot/grub2/grub.cfg
Bash
복사
2.
[필수] Yum Repository 설정 (Manage software)
Configure YUM repos with the given link
BaseOS http://content.example.com/rhel8.0/x86_64/dvd
AppStream http://content.example.com/rhel8.0/x86_64/dvd/AppStream
3.
Flatpak (Manage software)
이 문제도 V10부터 추가된 유형입니다. 어렵지는 않으니, 꼭 숙지하세요!
Configure Flatpak so that user student can install the codium from the Flathub repository
The following requirements must be met:
- A flatpak repository has been made available from http://ABC
- The flatpak repository should be named flatdb
- The repository must be configured only for the user student
- Install the codium application for user student
useradd student
passwd student # 다른 문제에 패스워드 설정하는 게 있었으면 추가
su student
cd
flatpak remote-add --if-not-exists flatdb https://ABC
flatpak search condium # App ID: org.abc.CONDIUM
flatpak install flatdb org.abc.CONDIUM
Bash
복사
최종 확인
flatpak list | grep codium
Bash
복사
4.
Resize LVM (Configure local storage)
스토리지 삼총사 문제가 나오는데, 그 중 첫 번째로 extend로 기존 LV를 Resize 하라고 나옵니다.
Resize the logical volume VO and its file system to 230MiB. Make sure that partition is seldom exactly the same size requested, so a size within the range 217MiB to 243 MiB is acceptable
lvextend -r -L 230M /dev/VG/VO
lvs # 현재 Logical Volume 사이즈 확인 (Ex. 252.00M)
lvresize -r -L 230M /dev/VG/VO
# y => Logical volume VG/VO successfully resized
# +230M은 현재에서 230M을 늘리는 것
lvs # 변경된 LV 사이즈 확인
Bash
복사
Partition 명령어
•
parted /dev/sdb unit MiB print
•
parted /dev/sdb rm 2
•
parted /dev/sdb unit MiB print free
사용 가능한 공간
5.
Create LVM (Configure local storage)
스토리지 삼총사 문제 중 두 번째로 전형적인 LVM 만들기 문제 입니다. 무조건 fdisk 쓰세요!!! parted 사용하면, 헷갈리고 fdisk가 훨씬 쉽습니다.
Create an LVM name wshare from wgroup volume group. Note the following:
- PE size should be 8MB
- LVM size should be 50 extents
- Format with "ext4" file system and mount it under /mnt/wshare
- and it should auto mount after next reboot
#1. 파티션 생성
fdisk /dev/sdb
## n => p => 2 => Enter => +500M (8MB x 50 = 400MB에 추가)
## t => lvm => w (저장)
#2. PV 생성
pvcreate /dev/sdb1
pvdisplay # 확인
#3. VG 생성
vgcreate -s 8M wgroup /dev/sdb1
vgdisplay # 확인
#4. LV 생성
lvcreate -l 50 -n wshare wgroup
lvdisplay #확인
#5. ext4 포맷
mkfs.ext4 /dev/wgroup/wshare
#6. 마운트 포인트 생성 및 등록
mkdir -p /mnt/wshare
echo "/dev/wgroup/wshare /mnt/wshare ext4 defaults 0 0" >> /etc/fstab
#7. 즉시 마운트
systemctl daemon-reload
mount -a
Bash
복사
최종 확인
lsblk
df -h
Bash
복사
6.
Swap Partition (Configure local storage)
스토리지 삼총사 문제 중 세 번째는 Swap 구성하기 입니다. 이 또한 fdisk로 진행하시면 훨씬 정확히 쉽게 할 수 있습니다.
Create a swap partition of 400 MB and make it available permanent
#1. 현재 상태 확인
swapon --show
lsblk
#2. 파티션 생성
fdisk /dev/sdb
## 'n' => p => 2 => Enter => +400M
## 't' => swap => 'w' (저장)
#3. swap 포맷
mkswap /dev/sdb1
#4. swap 즉시 활성화
swapon /dev/sdb1
swapon --show # swap 활성화 확인
#5. /etc/fstab 등록
blkid /dev/sdb1 # UUID 확인
echo "UUID=abcd.. swap swap defaults 0 0" > /etc/fstab
Bash
복사
최종 확인
swapon -a # fstab 기반 swap 전체 활성화 테스트
swapon --show # swap 활성화 확인
free -h # 최종 swap 상태 확인
Bash
복사
7.
Tuned (Operate running systems)
이 문제는 그냥 고생했어! 쉬어가~ 이런 느낌?
Configure recommended tuned profile
dnf install tuned -y
systemctl enable --now tuned
tuned-adm recommend # virtual-guest 라고 나온다고 가정
tuned-adm profile virtual-guest
# 반드시 재부팅해서도 잘 설정되었는지 확인하기
reboot
Bash
복사
최종 검증
tuned-adm active # 위에서 설정한 'virtual-guest'가 보이면 됨
Bash
복사